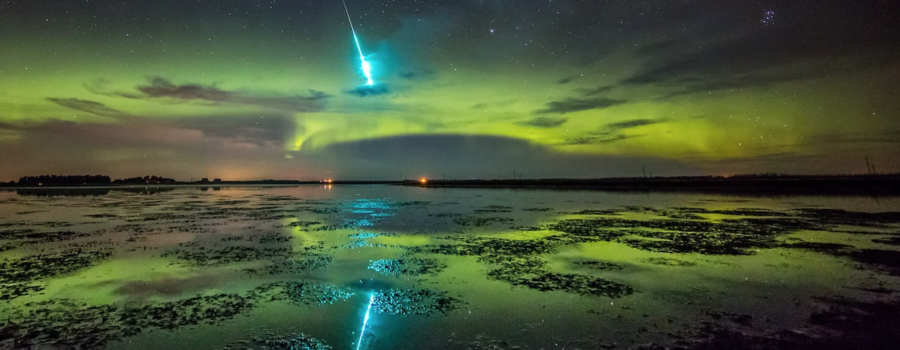
METEORS ARE QUICK!
And most are little. So you have to use quick settings to capture the meteors as bright as you saw them with your eyes.
It’s like this: if you make a well exposed night sky image with a shutter speed of 30 seconds, and a meteor flashes through the scene in 1/10 of a second, you’ll be lucky to even see any of that event on the finished image. Heck I could quickly walk through a 30-second night exposure and not be exposed on the sensor, and I’m not that fast! So what you want to do is to set up your camera, using ALL the technical light gathering capabilities of your camera and lens. What does this mean?
ISO: Your camera’s sensor, and its ability to resolve light. It’s a balancing act between resolving light and managing iso noise in the final image. This is the first of two ‘better equipment’ realities that you will be faced with for this kind of photography. Most of the newest cameras can easily shoot at 3200 ISO, and some can dip down comfortably to 10,000+ ISO. This is a HUGE advantage when setting up your camera to capture all the meteors you can spot with your eyes. Unfortunately, a camera that only makes good quality images up to 800 or 1600 ISO is going to struggle to capture all but the brightest.
Aperture/F-stop: The size of the hole in the lens that lets light into the camera. The bigger the hole, the more the light. This is represented as you F-number. The smaller the number the bigger the hole. This is the second of the ‘better equipment’ realities to be faced when making these images. Typically, a more ‘open’ aperture means a more expensive lens. You will struggle shooting at night with a lens that only goes as open as F4 or F3.5 as comes standard with kit camera lenses (lenses that come with the camera when you bought it). A good starter night lens will shoot at a maximum aperture of 2.8, but it’s best for this specific situation if your lens can be as open as F1.8, F1.4 or F1.2. My go-to lens this year will be a Sigma 20mm wide angle with a maximum aperture of F1.4. I will also have my Canon 16-35 F2.8, but at matching camera settings, the F2.8 lens will capture only 50% of what the F1.4 lens will capture.
Shutter speed: The time the camera allows light to be exposed to the camera sensor. Using the maximum available ISO and F-stop, it allows my camera to make a nice exposure of the night sky in 3-5 seconds. I tend to error on the side of overexposing slightly, as it’s easier to edit down a bit rather than trying to bring up a too dark image.

BASE SETTINGS
Using my best gear, which includes the brilliant Canon EOS R5 paired with my Canon RF 15-35 F2.8lens my settings are:
- ISO: 6400-10000
- Aperture: F2.8
- Shutter Speed: Max 5-10 seconds
I will have my second setup going as well with a Canon 5Dmk4 or my Canon 6D paired with my Sigma ART 20mm F1.4 lens. Settings for this rig are:
- ISO: 3200
- Aperture: F1.4
- Shutter Speed: Max 10 seconds
On the flip side, I’m not discouraging you from going out and shooting a meteor shower if you have a beginner DSLR camera with a kit type lens, you will simply have to stretch the shutter speed. Here is a typical setup for this kind of gear:
- ISO: 1600- 3200 (depending on the age of the camera. Go to the max available ISO and move it back one step, Ie. if your camera has a max ISO of 6400, use 3200. there will still be digital noise in the shot, but better to capture a meteor with a bit of digital noise than no meteor at all.
- Aperture: Whatever your lens will open up to. F3.5 or F4 likely.
- Shutter Speed: 20-30 seconds.
Your reasonable expectations with this gear is that you’ll see the brightest meteors on the camera image, but all the little ones won’t be more than a very thin line at best.
Cameras that work great for this kind of shooting include: Canon Eos R5, Canon Eos R6, R6ii, Nikon Z62, Nikon Z8, Nikon Z9, Canon 6DmkII, Canon 90D, Canon 77D, Canon T7i, Nikon D850, Nikon D810, Nikon D500, Nikon D7200, Sony A7sII, Sony A9, Sony A6500. There are many more good setups. Check with your Camera Store! (My Camera Store is The Camera Store here in Calgary)

CAPTURING ALL THE METEORS
Now, how on earth do you capture ALL the meteors in space? Well, with the widest lens you own for starters helps. I have an 11mm wide lens that is the widest in the world, but it’s at F4 maximum aperture, so it’s not the best for this type of astro event. It’s better for Aurora and Milky Way where I am fine leaving the shutter open longer.
The key to capturing every meteor that falls in the camera field of view is to always be shooting. This is accomplished by using a locking cable switch. With your camera set on ‘Continuous Shooting’ you simply set your camera up with your settings, make a nice composition of the area of the sky you want to capture and then just press the switch and (usually) slide it up where it locks in the ‘pressed’ position. So once that first five second image is done, it will immediately shoot another and so on. Your camera will shoot and shoot until either the memory card fills up or the battery dies. This way it is almost always open to the sky, ready to accept these amazing meteors into its sensor!
For example, my Cable Switch is this one: Canon RS-80n3
You can use what’s called an intervalometer too. It’s a fancy version of the simple cable release. Normally what it is used for is to set up daytime timelapse sequences where a gap between the photos are needed. There is no gap needed between these night photos, so you don’t even have to turn on or set the (usually frustratingly confusing, especially at 2:00 a.m.) intervalometer, but simply use the release button the same way as the cable release.
Some cameras (most new DSLR’s and Mirrorless) come highly connected to the world, so app-based programs are available to set up continuous shooting sequences from your devices too.

FOCUS!! !!!
Probably one of the reasons amateur astro-photographers want to throw their cameras into the nearest pond is the inability to gain sharp focus at night.
You are trying to achieve whats called infinity focus. It’s where the camera sees everything in the distance as in focus.
If there is an available bright light way off in the distance, such as a farmyard light or the moon or car headlights on a distant highway, use your camera’s ability to auto-focus on these lights, then simply move your lens from auto focus to manual focus before taking another photo. Hint: Don’t zoom in on the light to gain auto focus, then zoom back out, as when your lens zooms, it’s infinity focus point changes.
What if you don’t have a bright light? Well, this gets a bit trickier. You can drop a friend off a mile away with a flashlight, drive back, focus on that light, then remember to go back and get your friend. Or you can use a technique called ‘live-view’ focusing.
Live-view is where you push your LV or Live View button and you see on the back of the camera what the lens is seeing, live. Mirrorless Cameras are always on Liveview, as what you are seeing on the screen is what the sensor is seeing. Again, don’t zoom in your lens at any point or your efforts will be for naught once you zoom back out again. With your lens focus button set on manual this time, you will use your ‘playback’ zoom (the buttons you use to zoom in on an image on the back of the camera you just shot) and zoom the live view on to 10X zoom. at this zoom level, you will point your camera at the brightest object in the sky, usually a bright star. You will see it bounce around in the screen, probably as a blurry orb. Your goal is to use the manual zoom ring on the lens to make that star as tiny as possible. You will watch it go from big and blurry to small to big an blurry again. Making it as tiny as possible with the zoom ring ensures you are at infinity focus. Shut off live view, ensure you don’t bump the focus or zoom ring and get shooting!

TRIPOD, OBVIOUSLY.
This doesn’t need to be said, does it?
Oh, use a tripod! You can’t take long exposure photos without one! AND, turn off any image stabilization your camera or lens might employ. (usually a switch on the lens). Heavy Duty tripods are best at night to avoid any vibration or shaking in the wind while your camera exposes the long exposures.

IT’S NOT A REALLY LONG EXPOSURE
The images with ALL the meteors is actually a Photoshop assembled composite image. I take all the shots that have a good meteor in them, then simply snip out just the meteor in the other photos and ‘paste in place’ on the background image I chose. It’s a tedious process, but oh so worth it. The milky way and stars stay put, and the meteors all get placed where they fell in the sky!

OTHER CONSIDERATIONS
Capture your night images in RAW recording format (and Jpg if you are uncomfortable editing RAW images) to allow yourself the most editing options, which brings me to White Balance settings. At night Auto White Balance doesn’t work great as there are no whites to balance against. So setting your camera on one of the presets such as Tungsten or Incandescent will save you tons of grief in the editing room. I personally use a K setting of 4300 in the deep dark of night. Shooting in RAW allows you to change this to anything you want in editing, but gives you a nice pleasing look in camera.
What’s not a Meteor
Lots of things in the night sky can be mistaken for a meteor. Satellites are the main faux shooting star, especially when viewed on the screen at home. It’s best to take a look at the frames before and after that shot, before you leap in happiness that you ‘caught’ a meteor. There are a bunch of Iridium Satellites that have very flashy panels that will look most like a meteor, only they are way slow and can be seen easily in consecutive frames.
Airplanes are easier to debunk as not meteors as they have flashing lights that show up at intermittent streaks. The last photo in this set is actually a tumbling satellite, which was cool to capture in its own right.
Also, Don’t get caught up chasing where the meteor fell last and moving your camera view there, as usually the next meteor is right where your camera was!


WORKSHOPS
I provide a variety of workshops throughout the year. From Beginner photography classes all the way to destination trips. Check out the link to my TicketTailor site to see all my current workshops.


